
Continuous Integration and Continuous Delivery have taken the world by storm. The nature of our business forces development teams to move quickly and be as efficient as possible, both in regards to standard software development, but also it’s delivery and quality assurance. In order to achieve these goals, we need tools that will enable us to reach them in a simple way. Thankfully, today we have access to a lot of CI/CD solutions, both free and paid, all very different, with different features and different goals in mind. In essence they all do the same thing – allow us to work smarter, not harder.
Our previous development infrastructure consisted of three parts. For issue tracking and Scrum process we used Redmine with Scrum Board plugin. It worked fine and served us great for years, but from today’s perspective it’s UI is seriously outdated and generally hard to use. We probably could give it a try to upgrade it, but sadly it is so old that we really do not want to try it. For hosting Git repositories we used Gitolite Redmine integration. It also worked fine, but it’s functionality is nonexistent compared to modern solutions, it lacks really basic functionalities like Pull Requests or commenting on commits. For continuous integration we were (and somewhat still are) using Jenkins. Now, don’t get me wrong – Jenkins is great and very powerful, requires minimal setup, can be scaled and we achieved some great success with it, especially with use of Groovy Pipelines. But here is the question, if there is a tool (GitLab, if you didn’t read the title) that could integrate all of the above, even for some loss of customizability and potential vendor lock-in, is it worth it? Well, let’s check it out!
1. Setup
How do we start then? The first decision to make is whether we want to use GitLab.com hosted service, or create our private GitLab instance on company infrastructure. This decision was simple to make – we don’t want to store the most valuable company asset (the source code) on public infrastructure, and given the recent problems with GitLab accessibility – this is just a better option. There are multiple ways of installing GitLab, but the easiest way for us was using prebuilt “batteries included” Docker image, which contains all services in one big bundle. This way of packaging multiple applications into one monolithic Docker image is a bit controversial in the community (the best practice is to join individual processes running in separate containers using Docker Compose, for example), but in my opinion it works great for such big and complex software packages, because all the internal complexity is completely hidden away. As far as installation is concerned, we already have a few Docker hosts, so running an additional container somewhere isn’t a big deal.
Documentation specifies that the following Docker invocation is a good start:
sudo docker run --detach \
  --hostname gitlab.example.com \
  --publish 443:443 --publish 80:80 --publish 22:22 \
  --name gitlab \
  --restart always \
  --volume /srv/gitlab/config:/etc/gitlab \
  --volume /srv/gitlab/logs:/var/log/gitlab \
  --volume /srv/gitlab/data:/var/opt/gitlab \
    gitlab/gitlab-ce:latest
As with everything shipped in a form of a Docker image, we could just blindly copy and paste it into a privileged console… but let’s slow down. Do we really understand what these parameters mean? First of all, on most Linux systems port 22 is already used by SSH server, so another binding on port 22 will surely conflict. SSH port is used by GitLab to run it’s internal SSH Git server. Since we are perfectly happy with using only HTTPS as before, we can remove this binding altogether. Also, in our case (and in most cases on typical production systems) HTTP(S) ports (80 and 443) are already taken by some Apache or Nginx web server running natively. Since we wanted to use our external Apache proxy (which was also doing SSL termination) on the company edge router, we had to change HTTP port binding to some other random-ish value. Also, we can remove the hostname, it seems not to affect anything.
After a few minutes of some heavy internal provisioning and initialization, you can visit the main page. It will ask for an administrator password first, then it will allow to log in. I have to admit that I was very pleasantly surprised by how easy this setup process was.
I will not get deep into typical administrative stuff. As a first thing you probably want to create users, assign them to groups, create repositories and hand out permissions. It’s not really interesting to be honest.
2. Projects
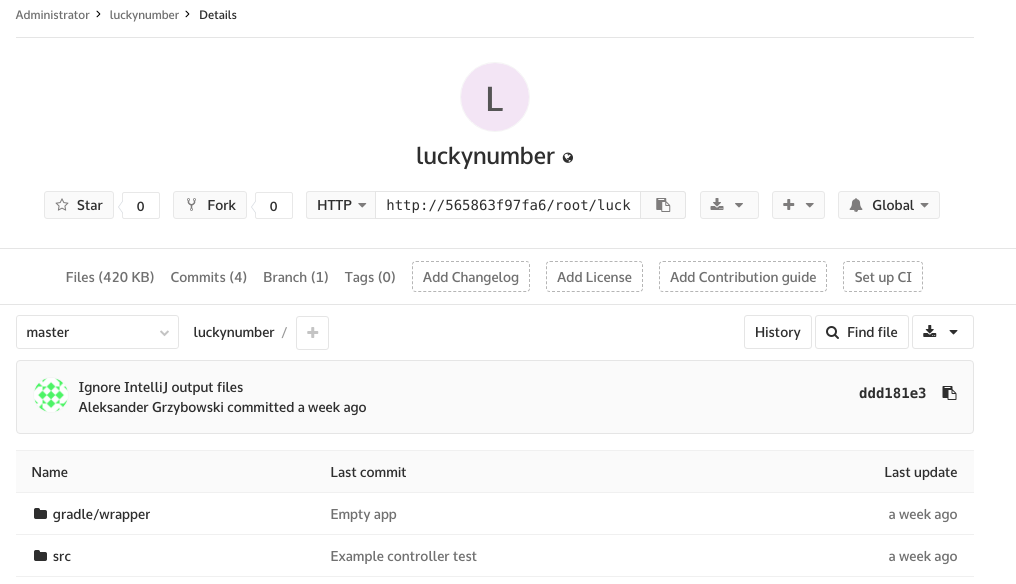
The next topic is migrating projects. Since Git is a decentralized system, it doesn’t really matter how many repository servers are used for a single project. However, even though we could work this way (and technically we are), we generally don’t think in a decentralized way – typically there is just one central repository. This becomes a challenge, when you want to migrate existing projects when developers are working on them at the same time. The first step is fairly easy – open a console (you are using Git from console, right?), create a new Git remote, and then push all branches to newly created GitLab repository. In the following examples I’ll use a very simple Spring Boot application (you can find it here).
cd ~/luckynumber
git remote add gitlab \
  https://gitlab.gliwice.itsilesia.com/agrzybowski/luckynumber.git
git push -u gitlab --all
git push -u gitlab --tags
After some uploading, you will end up with two identical repositories.
And…

The issue is that now we have 2 remotes, which means that if you previously had branch develop (and it’s remote tracking branch counterpart origin/develop), now there is a new tracking branch gitlab/develop. And that’s only on your local repository – other team members can’t know (by definition of decentralized model) that there is another remote somewhere. There are two ways of dealing with this. The easiest way is to go around the office and yell “Guys, please copy your files, delete the project and reclone from scratch”. And this might work, but expect a lot of hasty copy-pasting and useless bulk commits after this procedure.
There is of course a better way. Git has an option to simply change the remote URL. Send your coworkers a Slack message to run this:
cd ~/luckynumber
git remote set-url \
  https://gitlab.gliwice.itsilesia.com/agrzybowski/luckynumber.git
Be careful, though – all remote branch references (origin/xxx) will immediately get out of sync, so push their local counterparts as soon as possible. It’s a good idea to treat remote branches as volatile and not get too emotionally attached to them, because they can be overwritten at any time (remember, git rebase is your best friend, if used correctly). If they are important, don’t use them – just creating a local branch pointing to some commit will make it persistent forever.
3. The interesting part
Now let’s focus on CI/CD part. Glancing over the docs, the first thing that pops up is that GitLab CI is very tightly integrated to the source code repository. All configuration (in form of YAML file) is stored directly in the repository, jobs are based on branches and triggered on pushes, pull requests have little red/green checkmarks with build statuses and so on. Is this a good idea altogether? In my opinion it is, but only for the CI part, like running tests or collecting code quality metrics. Deployment (especially on production environments) should be decoupled from any version control system the application happens to use. But since we can get away with this in our internal projects (we have relatively little risk and hopefully responsible developers), we decided to go 100% GitLab and do our production deployments also there.
GitLab CI configuration is stored in .gitlab-ci.yml file. It has a specific structure, which we will not cover in full here. The documentation is very comprehensive, and you can also find some examples online. We will be building an almost barebones Spring Boot application with a few unit tests.
image: openjdk:8-jdk

stages:
  - test
  - package
  - deploy

test:
  stage: test
  script:
    - ./gradlew test

package:
  stage: package
  only:
    - master
    - develop
  script:
    - ./gradlew bootRepackage
  artifacts:
    paths:
      - build/libs/luckynumber-0.0.1-SNAPSHOT.jar

deploy-test:
  stage: deploy
  only:
    - develop
  script:
    - ./deploy-test.sh

deploy-prod:
  stage: deploy
  only:
    - master
  script:
    - ./deploy-prod.sh
There is a lot of stuff going on here, let’s break it down. First of all, the recommended way of building/testing/packaging your application is by using ephemeral Docker containers for creating temporary and 100% reproducible build environments. We went through a lot of pain on traditional Jenkins because of conflicting JVM versions, badly installed Grails distributions or even globally installed NPM packages (which “no one remembers installing”…). Using Docker containers removes this problem completely – every time a build is triggered there is a guaranteed fresh environment available. Here we specify OpenJDK public image, but you can use any, even your own. After setting up the image name, we define build stages. We use very typical steps – build/package/deploy, but they are of course arbitrary. For each stage we can define:
- branch constraints – for example, deploy to production only from master,
- artifacts – they are preserved across stages and stored internally in GitLab for later download,
- a Bash script – defining what to actually do.
I have to admit that I really dislike writing long shell scripts as a list of YAML elements (even though online examples seem to encourage this) – some characters like & have special meaning in YAML, which means you have to use strange escape sequences, and UNIX gods help you if you have to create some nested command with sed and regexes for example. For this reason, the best way to do it is to write separate scripts and commit them to the repository, then invoke them from YAML script. And that’s exactly what we do here.
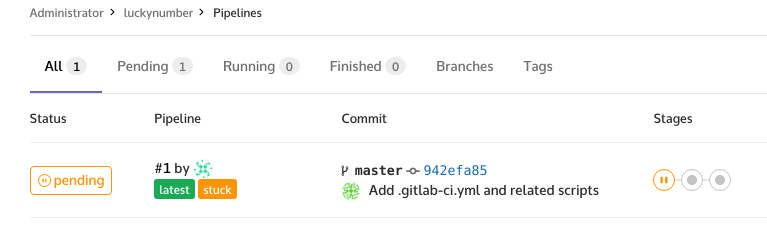
After committing .gitlab-ci.yml file to repository you can head to the tab CI/CD and look at a newly triggered job. It will be in a paused state… because we didn’t tell GitLab yet how to run our builds! For this, we will have to add a so-called GitLab Runner. What is a Runner? In essence, it is a machine which will execute our jobs. It can be a physical server, a virtual machine, or even a throwaway AWS EC2 instance running Docker Machine on autoscaling cloud infrastructure! Okay, getting back on the ground, since our needs are rather modest, we decided to use a small KVM virtual machine, running on the same server GitLab itself is running on. It’s explicitly discouraged by the documentation for management and security reasons, but we have 24 GiB of RAM and a lot of disk space there, so there shouldn’t be any capacity problems, and top performance isn’t really needed. We will be using a Docker executor, which is just a small service that needs access to Docker daemon on the underlying host.
sudo wget -O /usr/local/bin/gitlab-runner \
  https://gitlab-runner-....../gitlab-runner-linux-amd64
sudo chmod +x /usr/local/bin/gitlab-runner
sudo useradd \
  --comment 'GitLab Runner' \
  --create-home gitlab-runner \
  --shell /bin/bash
sudo gitlab-runner install \
  --user=gitlab-runner \
  --working-directory=/home/gitlab-runner
sudo gitlab-runner start
And as a last step, we need to register the runner, so it becomes visible in GitLab and it can be used to schedule jobs. Of course, you can add more than one runner – GitLab will automatically load-balance jobs across them. You can also do some fancy stuff, like locking a runner for specific project or attaching tags for easier administration. Here we just answer the questions one by one. We can obtain GitLab-CI token for a shared runner from administration page (Admin area > Runners) and paste it here, it needs to be done only once. We can safely enable this runner to run multiple projects and run all jobs.
$ sudo gitlab-runner register
Please enter the gitlab-ci coordinator URL (e.g. https://gitlab.com )
https://gitlab.gliwice.itsilesia.com
Please enter the gitlab-ci token for this runner
...
Please enter the gitlab-ci description for this runner
[gitlab] its-runner
Please enter the gitlab-ci tags for this runner (comma separated):

Whether to run untagged jobs [true/false]:
[false]: true
Whether to lock Runner to current project [true/false]:
[true]: false
Please enter the executor: ssh, docker+machine, docker-ssh+machine,
   kubernetes, docker, parallels, virtualbox, docker-ssh, shell:
docker
Please enter the Docker image (eg. ruby:2.1):
debian:sid
Runner registered successfully. Feel free to start it, but if it's
  running already the config should be automatically reloaded!
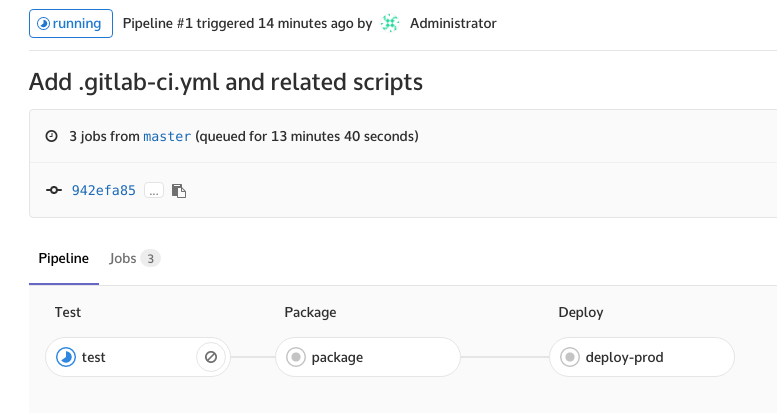
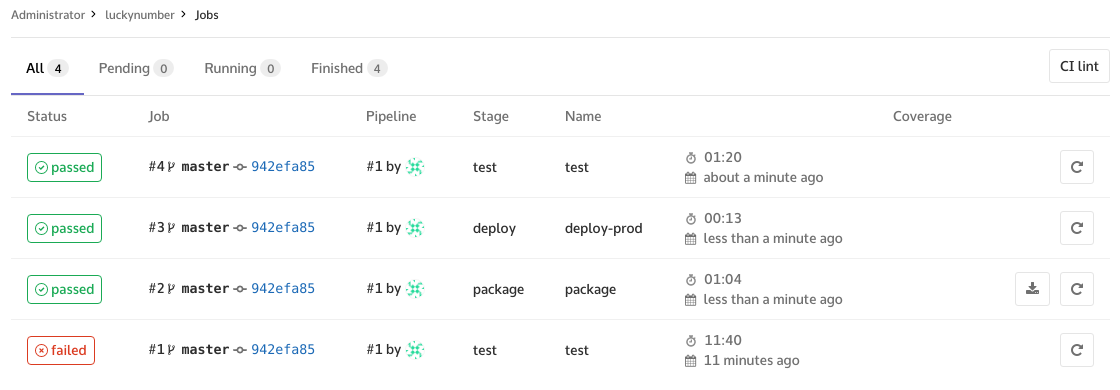
Right after applying those settings our newly created pipeline should kick off automatically. Opening CI/CD tab, we can see the individual pipeline stages, and show the console output.
And what about deployment? Surely we need to get access to some production servers via SSH or in some other way? That’s the problem we discussed earlier. Should GitLab have access to external servers at all? That’s a tough question, and there is no easy answer for all use cases. We decided that the gained simplicity and full CI/CD integration is worth the extra risk. But in any case we absolutely shouldn’t store any credentials or passwords inside repository, ever. GitLab has a simple Secrets feature, which allows us to define special variables, that at the time of job execution will get injected into environment. We defined a single SSH_PRIVATE_KEY variable, containing a private key, that will be subsequently used to access our test server. But there is a catch! All jobs always run in containers, and we need to make sure that our container has all the tools necessary to perform a deployment, even basic ones like ssh-agent or bzip2. We can use a package manager to quickly install what’s missing in the image, or simply use a bigger image (like ubuntu) with all tools preinstalled.
For our SSH deployments, we created simple script (idea was taken from the official docs) that configures ssh-agent with a private key required to access the server. This simple script starts ssh-agent, disables SSH Host Key Checking and adds a private key to the in-memory store. Disabling host checking is sadly necessary, otherwise we would have to manually approve connections every time (not once – remember the part about fresh containers?), and we can’t do that – there is no keyboard/terminal input when job runs.
#! /bin/bash
set -e

echo "Configuring ssh access..."
which ssh-agent || ( apt-get update -y && apt-get install openssh-client -y )
eval $(ssh-agent -s)
ssh-add <(echo "$SSH_PRIVATE_KEY")
mkdir -p ~/.ssh
echo -e "Host *\n\tStrictHostKeyChecking no\n\n" > ~/.ssh/config

echo "SSH configured successfully, added ssh keys:"
ssh-add -l
And we are basically done! From this moment, every push to the repository will trigger a pipeline run. Tests will be executed for all branches (including feature ones), and an appropriate package+deploy procedure will be ran for develop and master branches.
There is still one last thing missing: the actual deploy script. This is of course dependent on the type of application and target environment. For frontend applications, we might build necessary assets using NPM and Webpack, then upload them through (S)FTP to a specific folder for Apache to serve. For Java apps deployed in Tomcat, we might build the .war file and put it into Tomcat directory, where the change will be detected and the app restarted. For Docker Swarm environments, we can build all necessary images, push them to private registry and trigger docker service update or docker stack deploy on the remote cluster manager node.
That’s everything we have for now. We’ve been using this setup for one of our legacy projects for a few months and it works very well. Our development team is very happy to have one, integrated experience and very visible progress. Stay tuned for updates!
But wait, there’s more!
We wanted to host GitLab on company network and expose it to the world through external HTTPS proxy. At first, it seemed that setting instance URL in administration panel to its HTTP equivalent is enough, because it worked for cloning and browsing. Unfortunately, there is a nasty hidden problem in doing only this. You see, when GitLab is accessed through external HTTPS proxy, it can’t be aware of this fact, and as a result all links inside GitLab have http:// and not https:// prefix. Not a big deal – developers can change the URL once when cloning and then forget about it, yes? Well, that’s technically true, however if you try to kick off any CI build you will find out that it mysteriously fails with empty page without any errors. It turns out that in some very rare cases the frontend part (and also the runner part) of GitLab actually uses the real configured URL of GitLab to retrieve data from the server. We need to tell GitLab it’s real external URL – but there is another catch! If you just specify https:// URL per documentation, it actually disables HTTP completely. Argh! The following manual configuration solves this problem.
external_url 'https://gitlab.gliwice.itsilesia.com'
nginx['listen_port'] = 80
nginx['listen_https'] = false
nginx['proxy_set_headers'] = {
  'X-Forwarded-Proto' => 'https',
  'X-Forwarded-SSL' => 'on'
}
